The following is taken from this rockclimbing.com article. I have copied it here with no changes other than basic reformatting.
KungFu Aiders: How to make Russian Aiders at home
I would like to start out by stating this: If Russ is producing and selling russian aiders (http://www.fishproducts.com) by the time you read this, then stop reading. Go buy those by Russ. Also, I have not ever seen the Trango or Fish product in person, only pictures on the net.
So here I am wanting some of these things and not being able to get any. “Spring” is upon us and still none are available from Fish. I decided to make my own. I looked at all the images I could find on this site and with Google. I read everything I could about current designs and suggested improvements. I came up with a rough design based on those images and my own needs.
Materials:
These are the materials and costs (some are approx) in canadian pesos.
Items bought:
- 1m 1/4" shock cord .............. $0.39
- 3m 2" flat webbing .............. $3.57
- 2m 1" flat webbing .............. $1.32
- 4m 1" tubular webbing ........... $3.60
- 1m 3/8" polyethylene tubing ..... $1.50
- 2x6m 6mm static cord ........... $19.20
- 1m 4mm static cord .............. $0.60
- 2x 1" plastic cam buckle ........ $1.20
- 0.5m 19mm velcro closure ........ $1.00
- 2x steel hook fixtures .......... $6.00
Items on hand (approx value):
- needle thread ................... $1.00
- scrap of 1" tubular webbing ..... $0.50
- heavy weight polar fleece ....... $2.00
- 1/4" white soft foam ............ $1.00
- 0.3m 1/2" tubular webbing ....... $0.50
Total: $41.88 CDN or $28.79 US
There are two different things to construct: the trees and the harnesses. In both cases I try to keep the sewing to a MINIMUM. The reasons for this is that it is hard to sew things strong at home and even harder to correct mistakes (and they will happen). For these reasons I use knots as much as possible. No need to be a boy scout though, I use an old favorite; the overhand knot. It's a small knot and plenty strong for our purposes.
Trees:
I'm not sure who came up with that name for these but that's what they are. Essentially a length of material with things to hook onto. Of importance here is that they be light, compact and that the things you hook onto stay open. Ideally this means metal rings but they add cost and weight (or little weight and a lot of cost if you go with titanium). It is simple enough to tie loops into a length of cord but you need those loops to stay open. For this I use the polyethylene tubing: the same stuff found on gear loops. This material is light, wears well and springs back to shape after being bent.
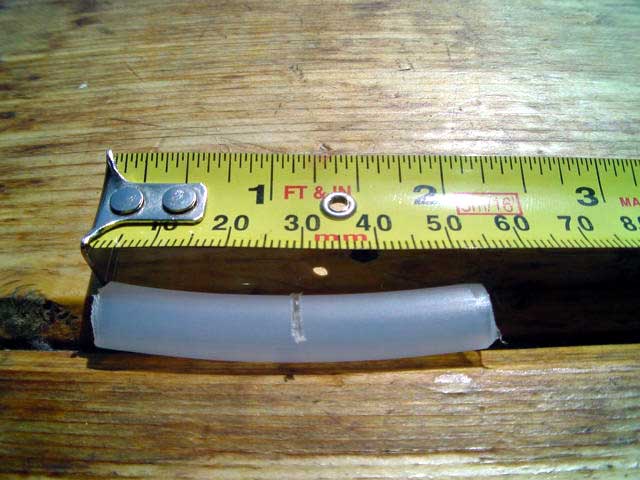 I made my trees with 5 steps so that means 10 rings per tree. Cut the tubing
into 20 5.5cm (21/8") lengths. With a hacksaw cut a
third of the way in middle of each bit to promote bending in the middle.
I made my trees with 5 steps so that means 10 rings per tree. Cut the tubing
into 20 5.5cm (21/8") lengths. With a hacksaw cut a
third of the way in middle of each bit to promote bending in the middle.
 You now have 20 ring openers that will keep the loops of cord open. Thread 10
tubing bits onto each one of the 6mm static cords.
You now have 20 ring openers that will keep the loops of cord open. Thread 10
tubing bits onto each one of the 6mm static cords.
 Make sure you picked cords of different
colours! I found that it is easier to thread
them if you cut the core out of one end of the cord to make it smaller (you'll
trim this bit off anyway). Next you make your loops. This is time consuming but
easy to do. Pick the step lengths you want (I chose 12" for bottom steps,
8" at top steps). Understand that each step is made of a pair of loops and
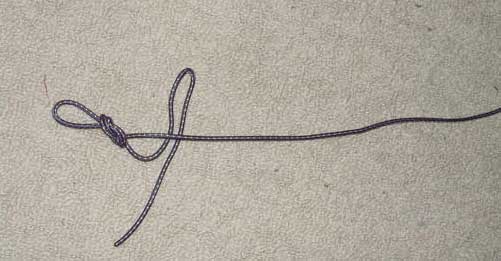
that you tie them from the bottom up. Make a loop with an overhand knot with
one bit of tubing so that when the knot is made the tubing is in the loop. Now
take the cord BELOW that loop and make another knot
ABOVE the loop (shown without the plastic bit for simplicity).
Make sure you picked cords of different
colours! I found that it is easier to thread
them if you cut the core out of one end of the cord to make it smaller (you'll
trim this bit off anyway). Next you make your loops. This is time consuming but
easy to do. Pick the step lengths you want (I chose 12" for bottom steps,
8" at top steps). Understand that each step is made of a pair of loops and
that you tie them from the bottom up. Make a loop with an overhand knot with
one bit of tubing so that when the knot is made the tubing is in the loop. Now
take the cord BELOW that loop and make another knot
ABOVE the loop (shown without the plastic bit for simplicity).
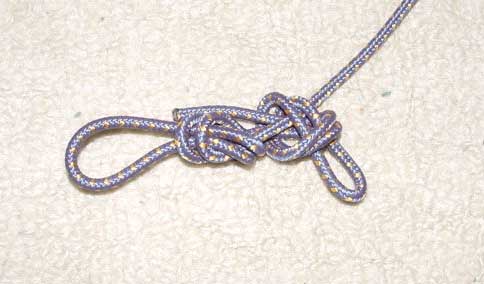
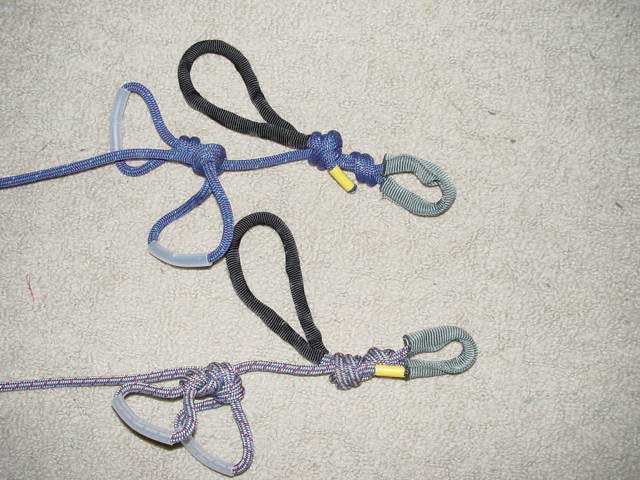 This is a bit tricky to explain but easy to do. The point of this is that when
you weigh the loops they will squish together rather than stretch apart (you
want your pairs at the same height). Repeat this ten times and you've done the
loops. At the top use some of the scrap 1" webbing to protect the clip-in
loop and some 1/2" webbing to cover the grab handle.
This is a bit tricky to explain but easy to do. The point of this is that when
you weigh the loops they will squish together rather than stretch apart (you
want your pairs at the same height). Repeat this ten times and you've done the
loops. At the top use some of the scrap 1" webbing to protect the clip-in
loop and some 1/2" webbing to cover the grab handle.
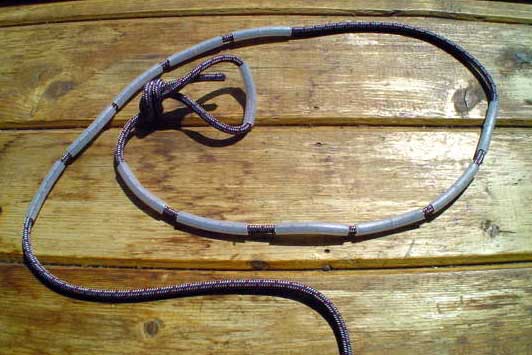
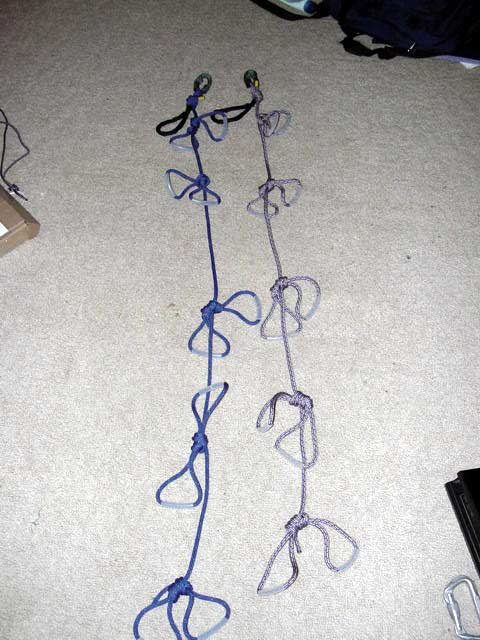 Add a piece of marking tape in case your buddies plan to make their own and
you're done!
Add a piece of marking tape in case your buddies plan to make their own and
you're done!
Harness:
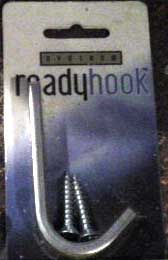 These are more complicated to make. By far the most critical piece of equipment
on these is the hook. One option is to use a BD cliffhanger hook but those are
expensive! I looked in different hardware stores and finally found the
“perfect” thing. They are hooks for things like coats or wet
towels. I found them at Home Depot.
These are more complicated to make. By far the most critical piece of equipment
on these is the hook. One option is to use a BD cliffhanger hook but those are
expensive! I looked in different hardware stores and finally found the
“perfect” thing. They are hooks for things like coats or wet
towels. I found them at Home Depot.
 These things are NOT fragile since they are made of steel. They're nice and
flat, solving the problem of keeping the hook facing outwards that you get with
round hooks. There are two holes so they can be easily secured around a belt of
webbing. The only problem was that the angle was a bit off. A few twists in a
vise (wear your safety glasses!) solved that.
These things are NOT fragile since they are made of steel. They're nice and
flat, solving the problem of keeping the hook facing outwards that you get with
round hooks. There are two holes so they can be easily secured around a belt of
webbing. The only problem was that the angle was a bit off. A few twists in a
vise (wear your safety glasses!) solved that.
With the hook taken care of there are two other major parts to the harness: the leg strap and the footbed.
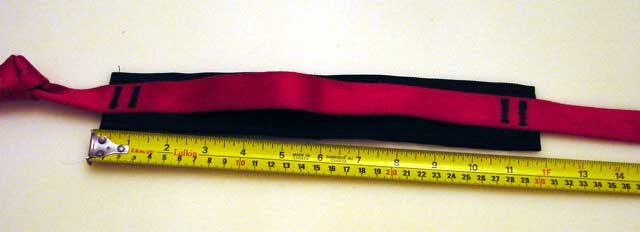
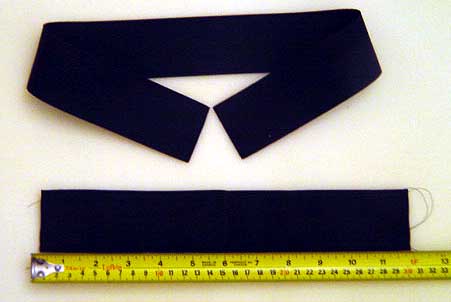 For the footbed I inspired myself from the Metolius easy Aiders. They have a
nice wide footbed and retainer webbing. I especially like the wide footbed
since it means more comfort. For each footbed I cut a 24" and a 8"
length of 2" flat webbing. The 24" piece is folded in half so that
the seam is in the middle. It is sewn on the edges lengthwise and in the middle
with a wide zig-zag stitch.
For the footbed I inspired myself from the Metolius easy Aiders. They have a
nice wide footbed and retainer webbing. I especially like the wide footbed
since it means more comfort. For each footbed I cut a 24" and a 8"
length of 2" flat webbing. The 24" piece is folded in half so that
the seam is in the middle. It is sewn on the edges lengthwise and in the middle
with a wide zig-zag stitch.
 The 1" tubular webbing is then “bartacked” to this footbed
twice at each end.
The 1" tubular webbing is then “bartacked” to this footbed
twice at each end.
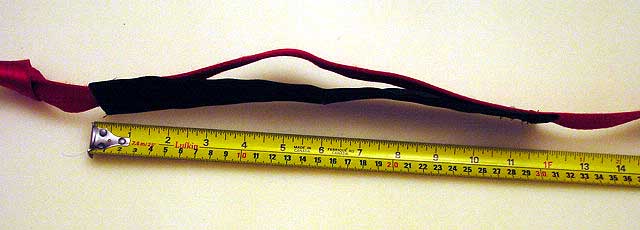
 Be sure to leave enough slack in the 1" webbing so that when the footbed
is bend into a “U” shape it does not bunch up the 2" flat
webbing.
Be sure to leave enough slack in the 1" webbing so that when the footbed
is bend into a “U” shape it does not bunch up the 2" flat
webbing.
 Note that in this case a bartack means a zigzag stitch with a medium to
large stitch width but very small stitch length. Take the 8" piece of
2" flat webbing and sew lengthwise it to the footbed so that the 1"
tubular webbing is sandwiched between the 2" webbing. This assures that no
wear will be put on the load-bearing webbing, making it safe to walk while
wearing these. Finish the footbed by tying and retracing an overhand knot,
closing the footbed loop. Trim off the excess. Since there is a very short tail
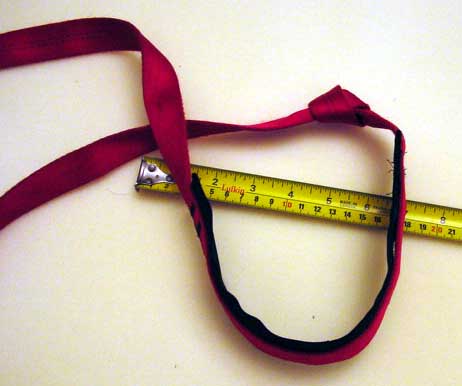
on this knot I bartacked the short tail to the long one to prevent slippage. To
keep the foot IN the footbed I used 1/4" shock cord treaded around the
footbed and tied together with a fisherman's knot. The loop goes over the laces
and heel of the boot/shoes/foot and is very secure.
Note that in this case a bartack means a zigzag stitch with a medium to
large stitch width but very small stitch length. Take the 8" piece of
2" flat webbing and sew lengthwise it to the footbed so that the 1"
tubular webbing is sandwiched between the 2" webbing. This assures that no
wear will be put on the load-bearing webbing, making it safe to walk while
wearing these. Finish the footbed by tying and retracing an overhand knot,
closing the footbed loop. Trim off the excess. Since there is a very short tail
on this knot I bartacked the short tail to the long one to prevent slippage. To
keep the foot IN the footbed I used 1/4" shock cord treaded around the
footbed and tied together with a fisherman's knot. The loop goes over the laces
and heel of the boot/shoes/foot and is very secure.
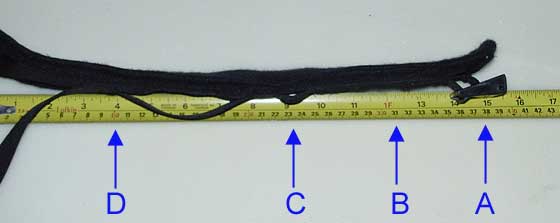 The leg strap requires the most sewing. Measurements will
depend on your own size but these work for me. For each leg you will cut a
16" length of 2" webbing, a 20" length of 1" flat webbing,
a 4" length of fuzz velcro and 1" length of hook velcro. You'll also
use one cam buckle on each leg. Start by sewing the buckle and 1" webbing
to the 2" webbing; I used two bartacks
(A). Right after the buckle
(and partly over the bartacks) sew on the 4" fuzzy velcro bit
(B). Directly after the
velcro take up some slack in the 1" webbing and sew it so that there is a
small loop of 1" webbing on top of the 2" webbing. This is where the
hook will be threaded through. A strong stitch on each side of this loop is
what you need (C). Bartack
the 1" webbing to the 2" webbing about 5" after the hook loop
(D). Lastly sew the 1"
bit of hook velcro to the underside of the end of the 1" webbing.
The leg strap requires the most sewing. Measurements will
depend on your own size but these work for me. For each leg you will cut a
16" length of 2" webbing, a 20" length of 1" flat webbing,
a 4" length of fuzz velcro and 1" length of hook velcro. You'll also
use one cam buckle on each leg. Start by sewing the buckle and 1" webbing
to the 2" webbing; I used two bartacks
(A). Right after the buckle
(and partly over the bartacks) sew on the 4" fuzzy velcro bit
(B). Directly after the
velcro take up some slack in the 1" webbing and sew it so that there is a
small loop of 1" webbing on top of the 2" webbing. This is where the
hook will be threaded through. A strong stitch on each side of this loop is
what you need (C). Bartack
the 1" webbing to the 2" webbing about 5" after the hook loop
(D). Lastly sew the 1"
bit of hook velcro to the underside of the end of the 1" webbing.
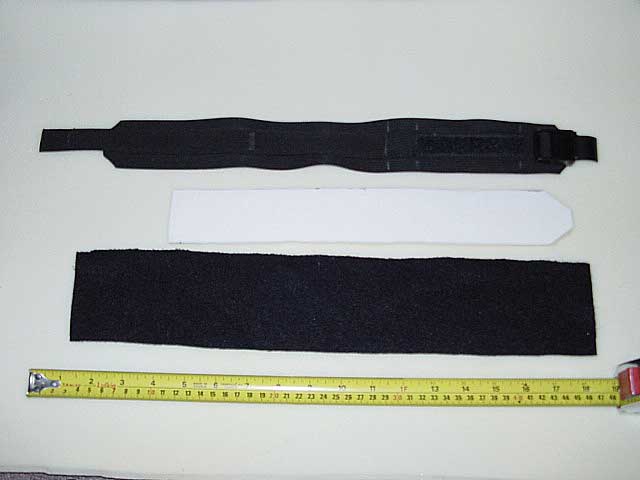 The point of this design is to put the 1" webbing through the cam buckle
and onto the velcro strip. The buckle is then closed and everything is held
tightly in place. Next cut a 12" x 1.5" piece of foam for padding and
a 17" x 3" piece of polar fleece to secure and cover the foam.
The point of this design is to put the 1" webbing through the cam buckle
and onto the velcro strip. The buckle is then closed and everything is held
tightly in place. Next cut a 12" x 1.5" piece of foam for padding and
a 17" x 3" piece of polar fleece to secure and cover the foam.
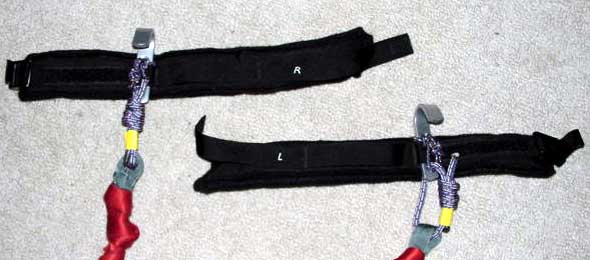 Place the foam on top of the fleece and the 2" webbing on top of the foam.
Pull the edges of the fleece back on top of the 2" webbing and sew it in
place all along the edge, keeping the foam in place. Note that you don't want
foam for the full length of the 2" webbing since it is meant to overlap at
the ends. I identified the left from the right by stitching an “R”
and “L” into the 1" webbing.
Place the foam on top of the fleece and the 2" webbing on top of the foam.
Pull the edges of the fleece back on top of the 2" webbing and sew it in
place all along the edge, keeping the foam in place. Note that you don't want
foam for the full length of the 2" webbing since it is meant to overlap at
the ends. I identified the left from the right by stitching an “R”
and “L” into the 1" webbing.
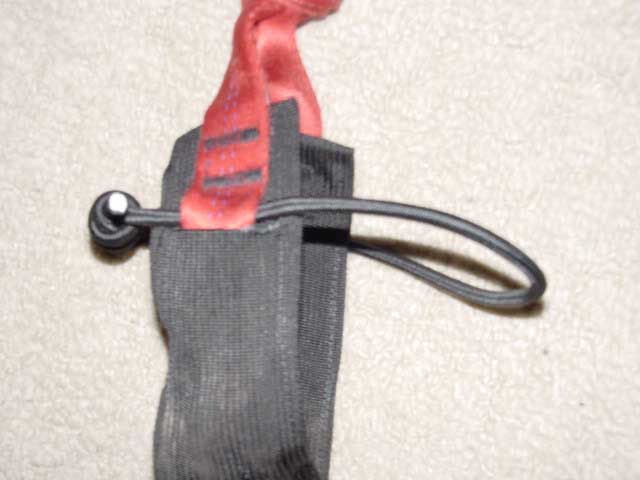
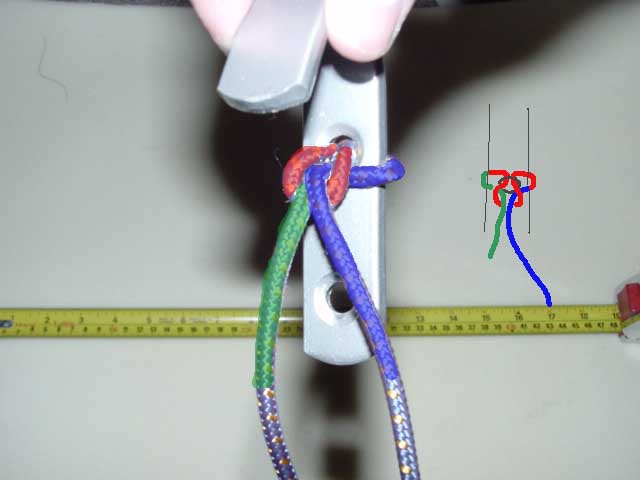 To secure the hook to the leg strap start by tying the top hole with the 4mm
cord as shown. The little drawing on the right sortof explains the knot.
To secure the hook to the leg strap start by tying the top hole with the 4mm
cord as shown. The little drawing on the right sortof explains the knot.
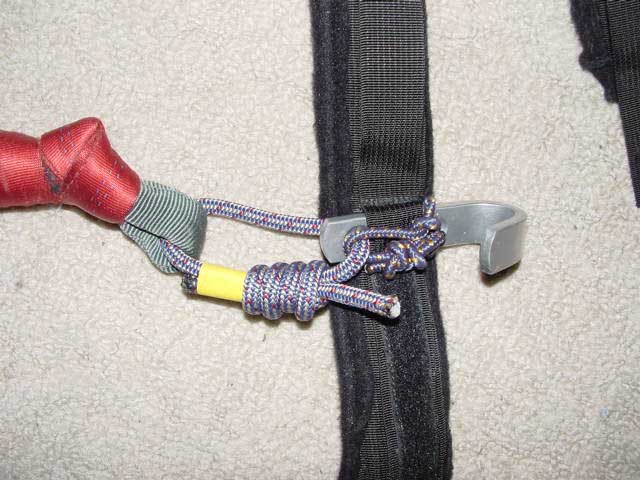 You want it so that the loop formed is JUST long enough to reach the bottom
hole. Slide the hook into the loop you left for it on the leg strap and pass
some 6mm cord through the bottom hole and the 4mm loop. Tie the 6mm cord with a
double fisherman knot.
You want it so that the loop formed is JUST long enough to reach the bottom
hole. Slide the hook into the loop you left for it on the leg strap and pass
some 6mm cord through the bottom hole and the 4mm loop. Tie the 6mm cord with a
double fisherman knot.
The leg straps are now completed!
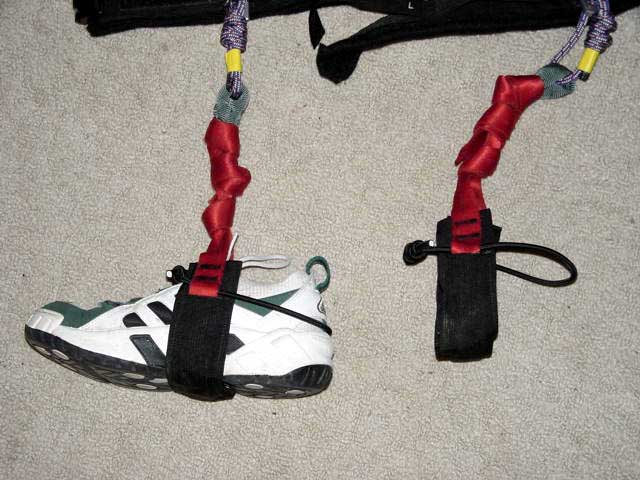
To attach the footbed to the leg strap tie the 1" tubular webbing around the 6mm loop on the hook. Make sure to protect the webbing with a bit of scrap webbing for abrasion resistance. Tie it with an overhand knot. This knot is your adjustment for length. To tie it start by putting on the footbed and leg strap. Find the right length for the webbing and then tie it about 1-2" short. The knot will tighten and stretch when weighted the first few times. If you tie it too long you'll be taking your weight behind your knees instead of under your feet and that is NOT fun. If you feel extreme pain in your calf muscle or behind the knee you need to shorten the leg harness.
So now you know how to make some of these for yourself. Remember, if you can buy these now from Russ at Fish Products, please do! Don't be cheap, support the climbing businesses!